There are many golfers who use golf score recording smartphone apps to keep track of their scores.
However, there are many problems with these score recording apps.
This is because many of the numbers displayed by the score recording apps are not numbers that will help you improve your score.
- Fairway holding percentage
- Number of OBs
- Par on percentage
- Number of putts
These are numbers that may lead to a slight increase in score, but have little relevance, and there are better numbers.
This is also called low probability.
The probability of par on percentage is discussed here.
Instead of the fairway holding percentage and the number of OBs, I suggest you record the number of OBs or too thin shots off the tee.
In order to get under 80, you need to keep the number of OBs or too thin shots off the tee to less than two in 18 holes.
As for the fairway holding ratio, the number of OBs, and the par on ratio, I think there are few people who know the appropriate values for each of these.
Even in business, there are many cases where people set a target with a low probability of success, and then do not feel that the target value is appropriate.
Employees who are given such numbers as targets will end up in a “death march”.
In recent years(in Japan), there have been many cases of employees committing fraud due to the pressure of the numerical targets, but I believe that the fundamental problem is not that the targets are too high, but that in many cases the probability is low and there is no sense of appropriateness.
I digress. Let’s get back to it.
In particular, the number of putts in a golf score has a very low probability of improving the score, and the way it is recorded should be reviewed.
First of all, a putt of 2 feet or 50 feet is the same stroke, but the degree of difficulty differs greatly.
Here is the number of putts by distance for PGA Tour professionals. (From “Every Shot Counts” by Mark Broadie)
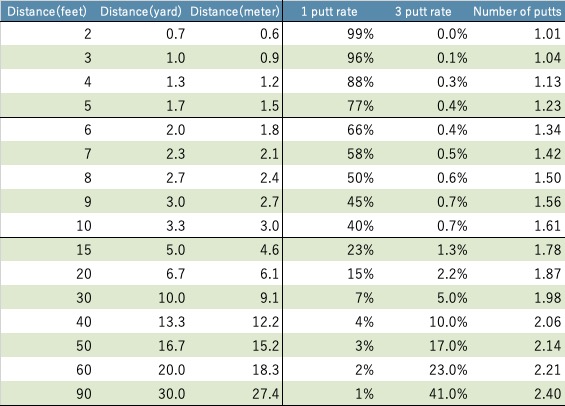
A putt of 2 feet in length will never miss 99% of the time for a professional, but a putt of 50 feet in length will only make 3% of the time for a professional.
In other words, if the course has large greens and long putts remain, or if your second shot is accurate and you have a high probability of hitting the green for par, the number of putts will increase because long putts will remain.
On the other hand, if you are unable to get on the green with your second shot, but are able to get close to the pin from around the green with your third shot, the number of putts will decrease.
Even on a course with small greens, the number of putts will decrease because the distance will be shorter.
In other words, you shouldn’t be upset if you putted 30 or 40 today, because the course and your last shot will greatly affect your putt count.
Putting in a round should be analyzed without the influence of the course and the immediately preceding shot.
The first and simplest way to do this is to look at the number of putts within 30 feet that you made 3 putts.
PGA Tour pros have a 5% chance of 3-putting within 30 feet; that’s only one in 20 times.
If your goal is to get under 80, you need to keep the number of putts within 30 feet that you 3-putt within one round.
However, I recommend that you record not only the number of putts within 30 feet that you 3-putt, but if possible, record all the putt distances in your round and compare them to the PGA Tour pro’s numbers.
If you do this, you will probably find that your weakness is putting at certain distances.
Once you know your weaknesses, you just need to strengthen them in practice.
Strengthening your putting in that way is much more effective than simply recording the number of putts you make in a round.
It is important to have a good grasp of the 12 different carry and run distances for the pitching wedge, gap wedge, sand wedge, and lob wedge distance wedge shots at 8-4 o’clock, 9-3 o’clock, and 10-2 o’clock.
Then, record the distances in a distance wedge matrix.
As for the run, it will vary depending on the hardness of the green and the speed of the day, so it should only be mentioned for reference.
In particular, you need to remember that the largest swing (10-12 o’clock) with a lob wedge will have the most spin and the smallest swing (8-4 o’clock) with a pitching wedge will have the least spin.
You want to be able to use 12 different distances and spins depending on the course and situation.
Even if you say you have an 8-4 o’clock swing, you may not have the correct swing width, for example, if your arms are up to about 9-5 o’clock.
Take a picture of your swing width with your cell phone or other device to match your perception of your swing width with your actual swing width.
Also, if your distance varies even with the same swing width, your swing tempo may be off each time, so practice keeping your swing tempo constant.
In order to keep the swing tempo constant, imagine a One-And-Two (or Ichi-Nino-San) tempo in your pre-shot routine, and try to hit at the same tempo in your actual shot, which will reduce the variation in distance.
Here is a distance wedge matrix for your reference.
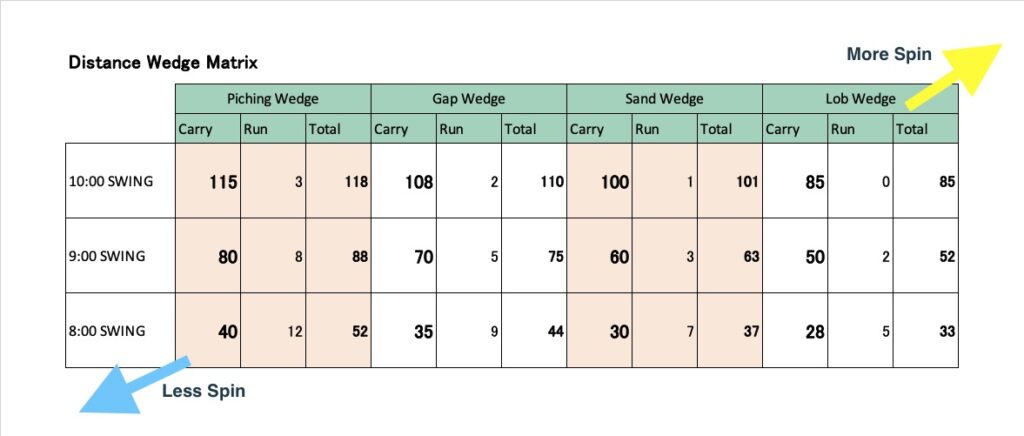
Excel template is here.
It is useful to have it saved in the cloud system in Excel online or Google Spreadsheet.
Also, your distance wedge distance may change with training.
It is a good idea to measure the distance wedge matrix every month or every three months.
If you can develop the skill of hitting the face of the wedge open for more than just bunker shots, there are several benefits.
- You can make subtle distance adjustments with a distance wedge.
- Ability to hit high balls with a finesse wedge
- The ability to get out of difficult lies with the left foot down
If you can make good use of the open face wedge shot, you can reduce your round by a few shots, but I think there are many people who are not good at it.
The correct image for hitting the ball is to put it in from the heel side of the club face.
This image.
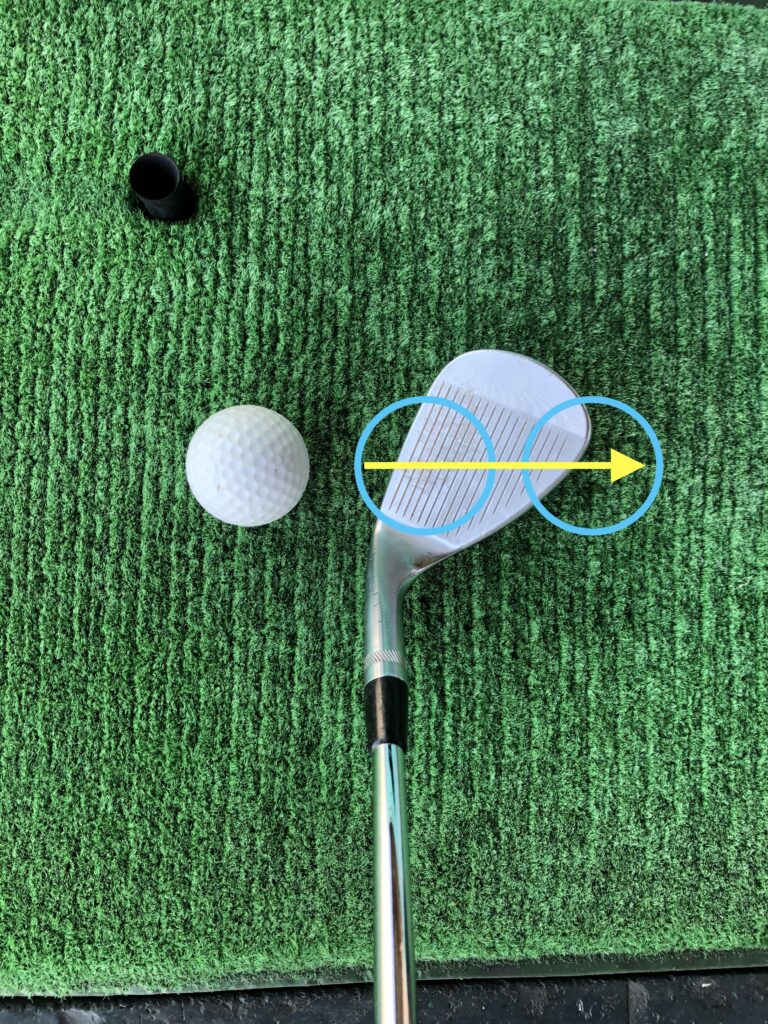
Through here, you can maximize the use of the groove area of the face.
As the ball travels across the face at an angle, you will be able to use more of the grooves and get more spin than if you use a square face.
You may be a little afraid of shank shot, but if you set up the ball properly and hit the ball with this image, you will not shank.
Don’t worry about the shank, just swing through it!
If you have trouble opening your face and hitting the ball properly, you are most likely swinging with this image.
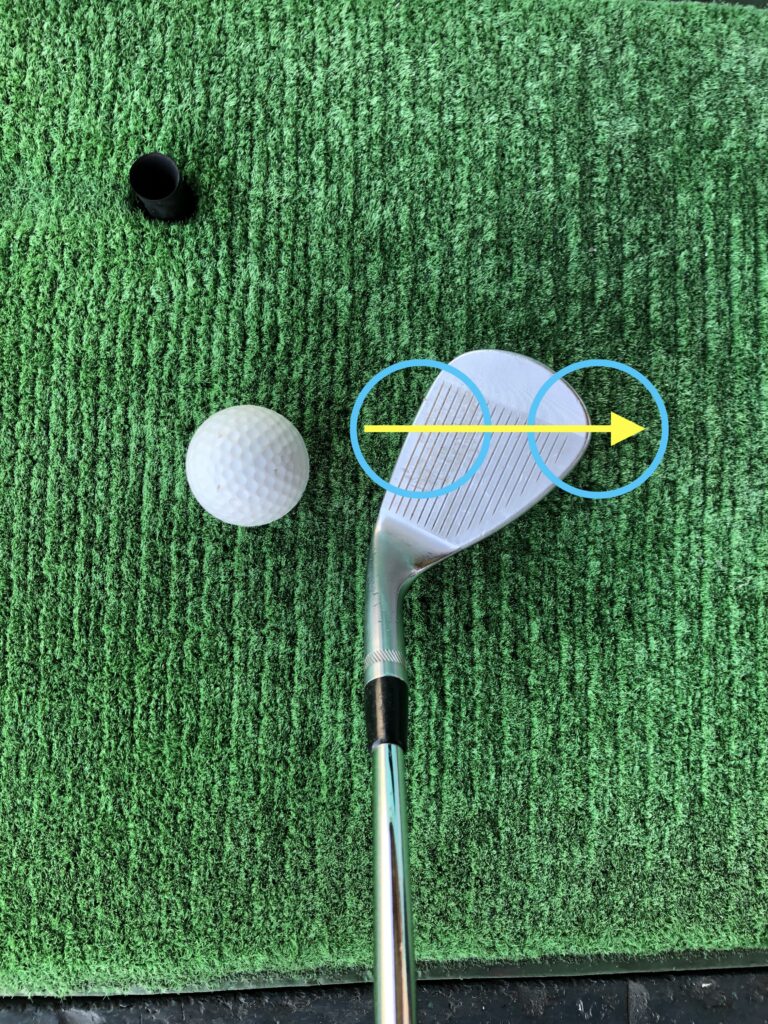
If the ball is placed in the middle of the face, the ball will go through the non-grooved area on the toe side of the face.
This will result in a weak shot that will lose distance, hit the toe side of the ball and top it, or leave a bad feel in your hand even if you hit it well.
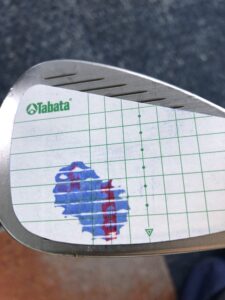
If you hit the ball well, you should be able to see a mark like this on the shot marker.
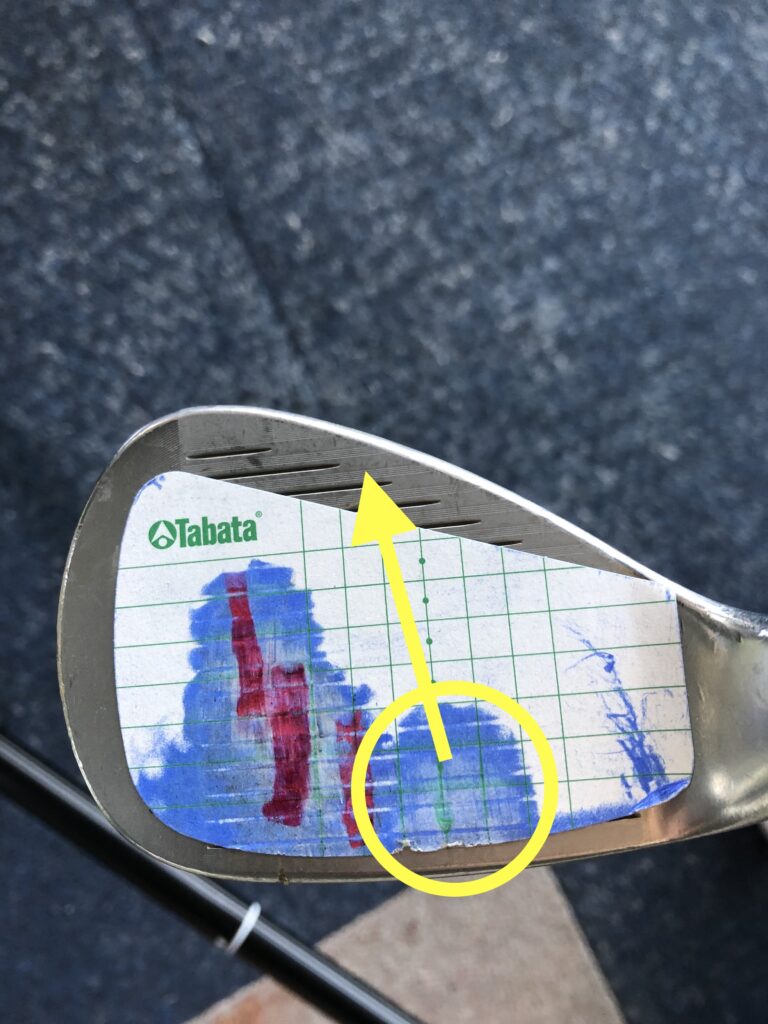
Practicing with a shot marker will help you visualize it better, so give it a try!
If the lie angle of your golf club is not correct, you will not be able to hit the ball as you aim.
The same goes for your short game.
If you find that every time you hit a shot, it’s off to the right or off to the left, the lie angle of your club may not be right.
The lie angle is very important for an accurate short game, so it is important to know exactly what you are doing.
Here is an easy way to check your lie angle without any special tools.
Some people use a shot marker that can cover the sole to check the lie angle, but this is not an “accurate” way to check the lie angle.
With this method, you can see if you are upright or flat, but you can’t tell how many degrees your lie angle is off.
The same is true for determining the lie angle based on height and hand length.
Some people set up more upright, some more hand-down.
It is difficult to determine the exact lie angle based on height and hand length.
The following procedure is the easiest and most accurate way to check your lie angle.
First, you will need a water-based pen (oil-based will not work) and a shot marker such as the following
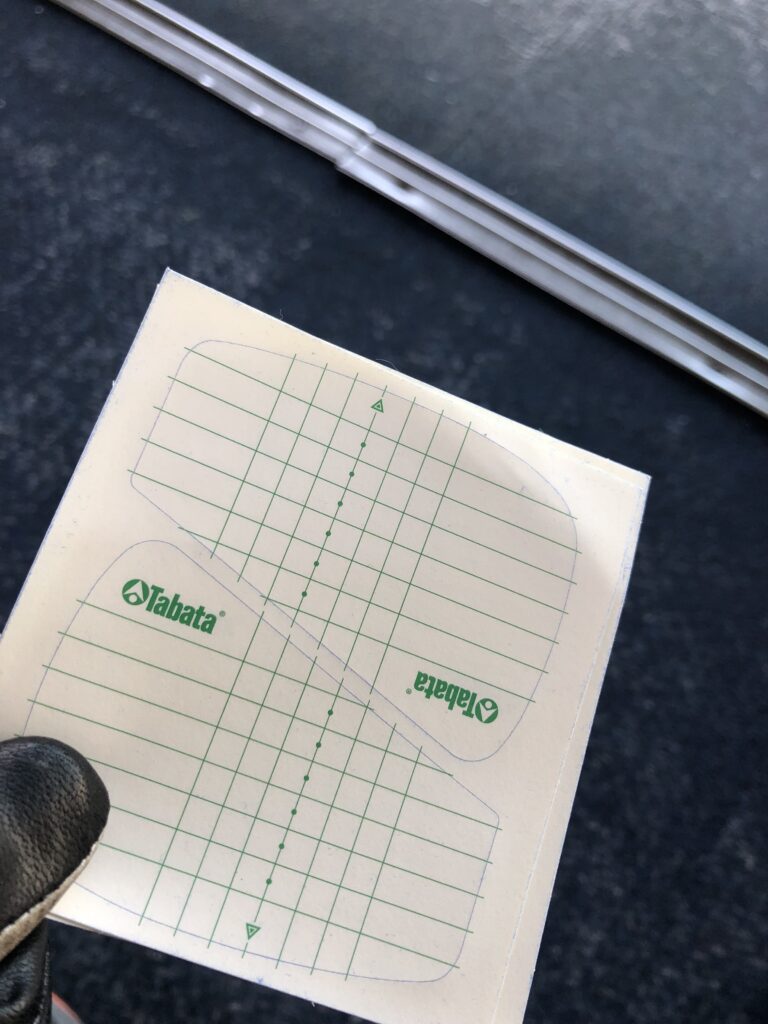
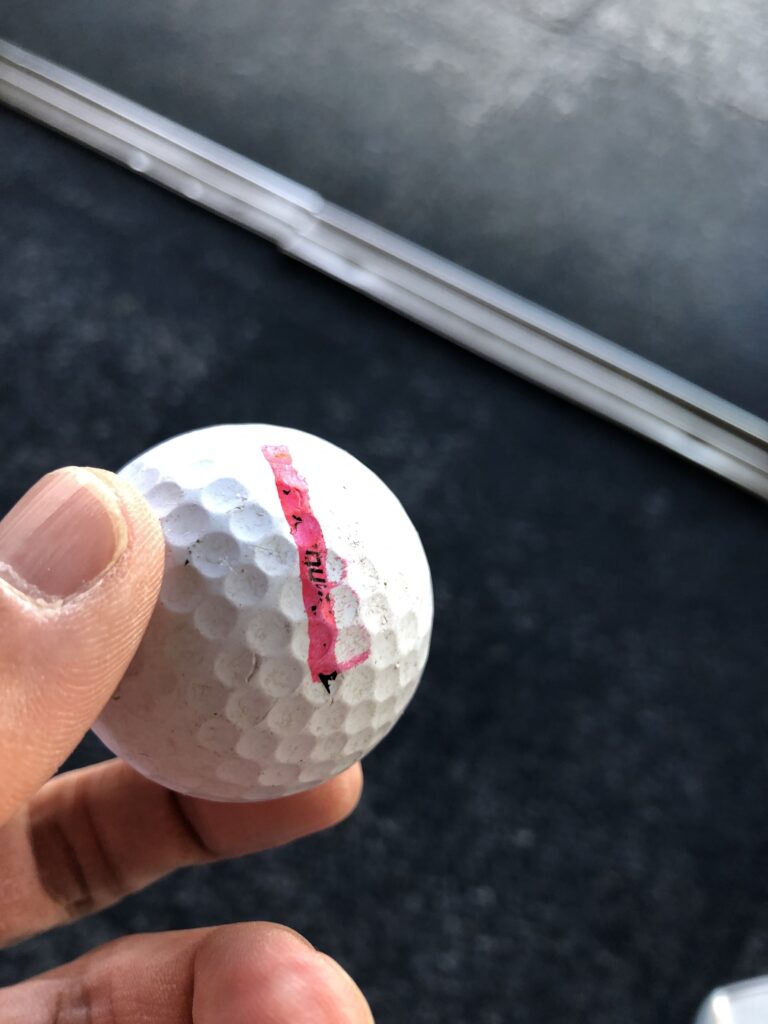
Draw a straight line on the golf ball with a water-based pen as shown below.
Set the ball so that the line is aligned with the target. Set the ball so that the middle of the line touches the ground.
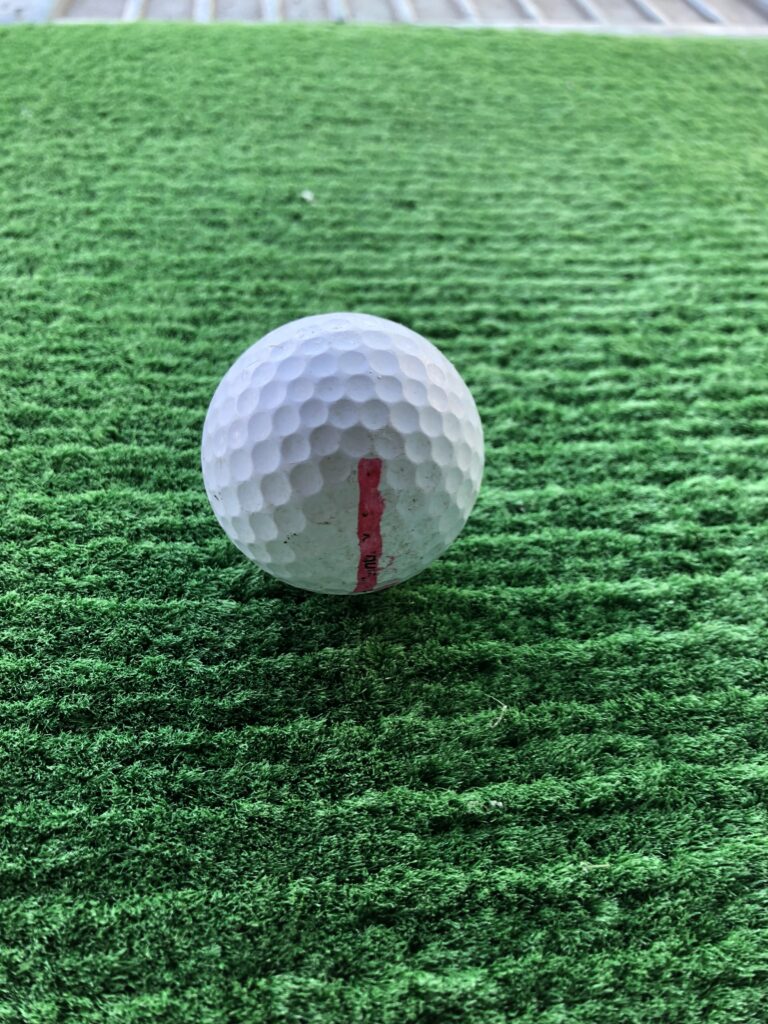
If the line is not on the ground, it cannot be measured properly.
However, if you can’t get it right, you can try again, so let’s try it first.
Then, take a shot with the club you want to measure the lie angle with.
When you do so, the shot markers will show shot marks and water-based pen lines.
It looks like this.
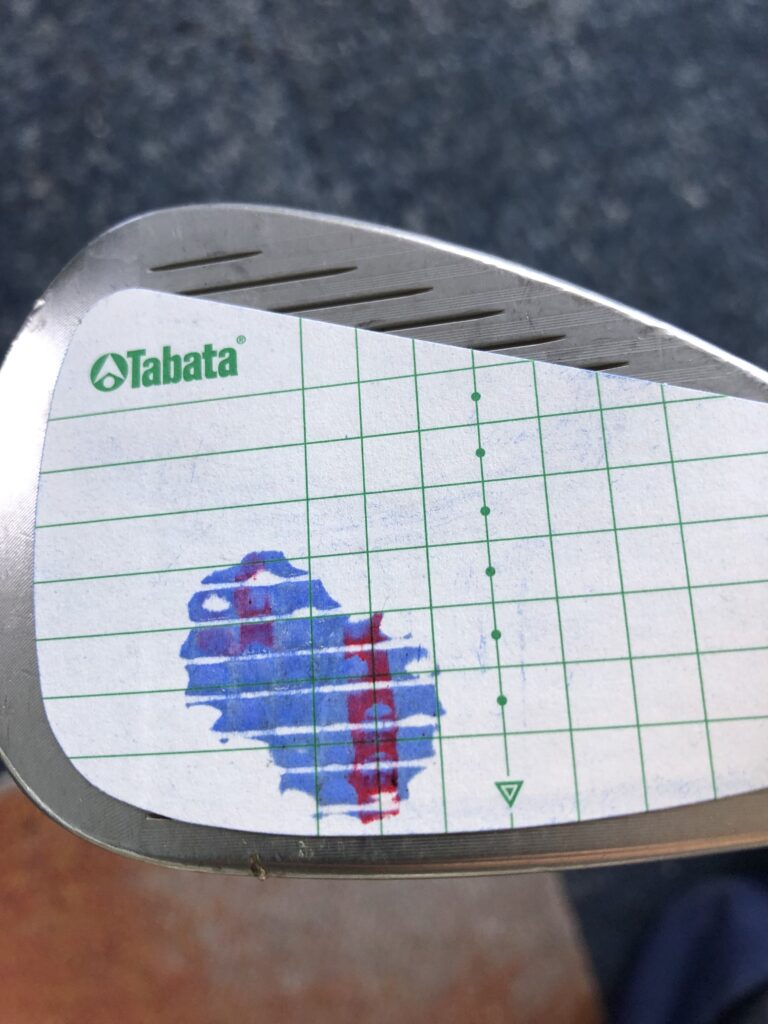
In this case, the line of the water pen is perpendicular to the bottom line of the club, so the lie angle is correct (it is slightly upright, but I think this is OK).
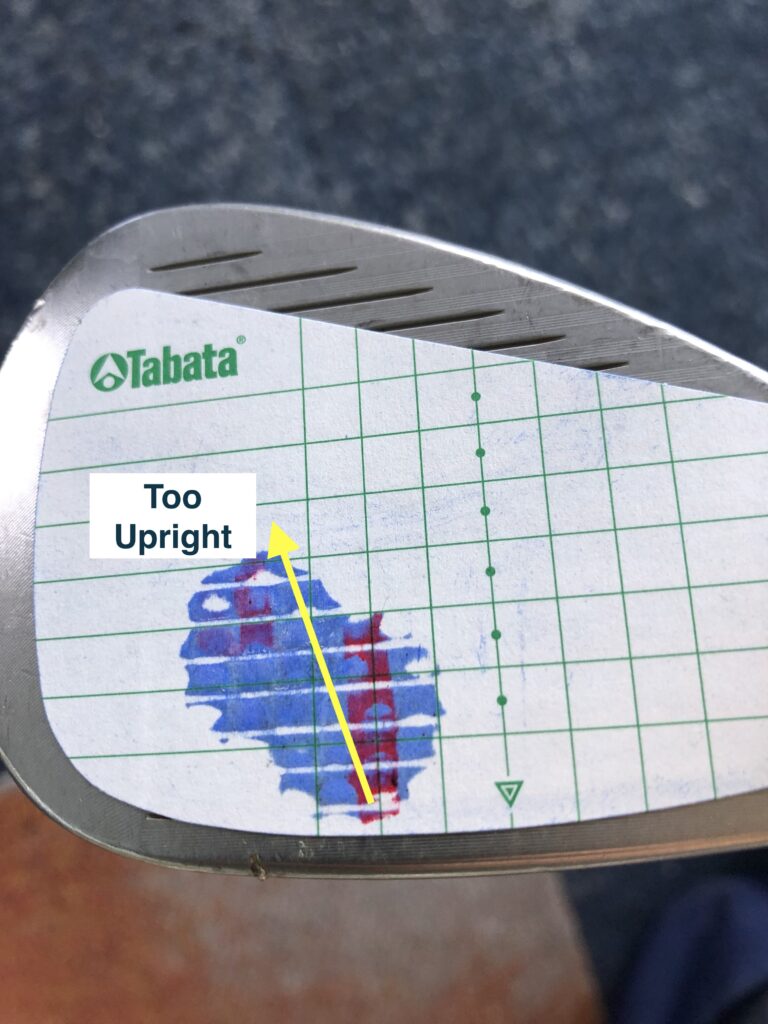
If this line of the water pen is pointing outward, the lie angle is too upright.
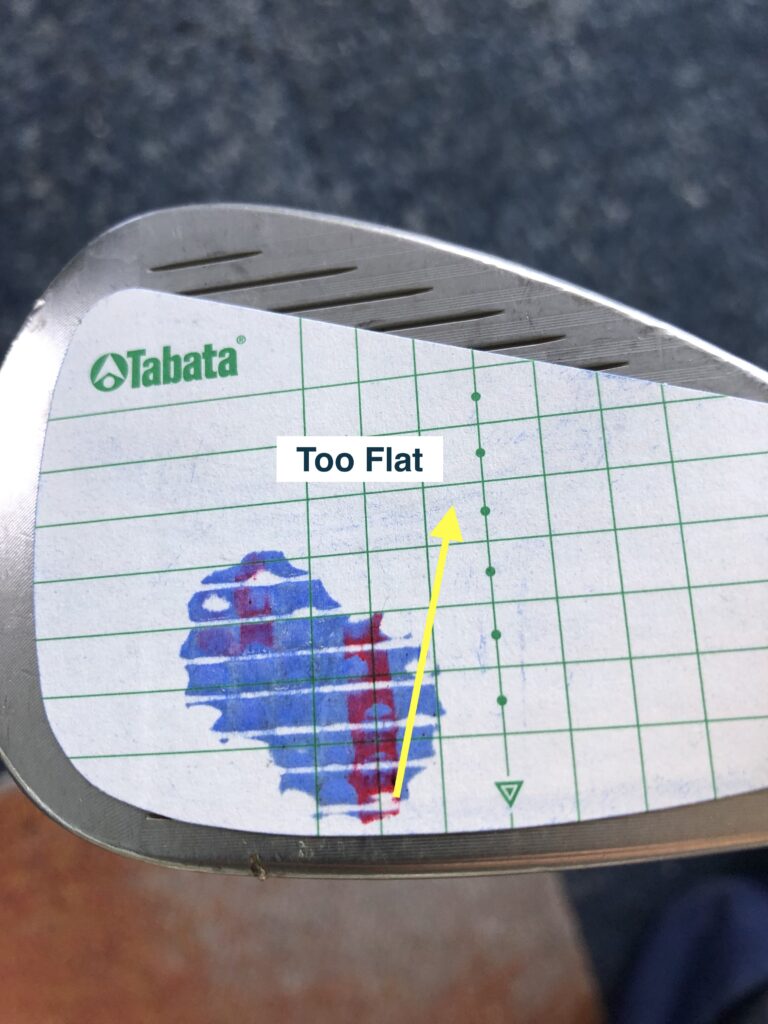
If the line is pointing inward, the lie angle is too flat.
To test it out, I teed up and took a shot. This is the leftmost line.
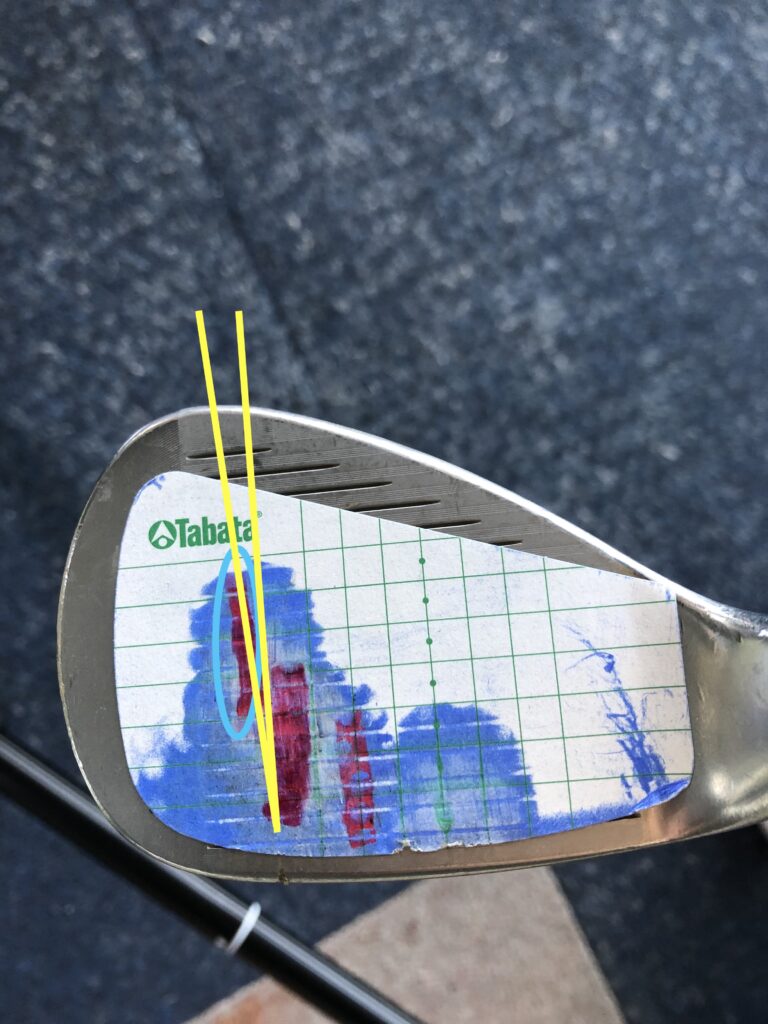
The line points outward and becomes more upright.
You can’t get the trend just once, so you should try a few times and if the trend is the same, you should adjust the lie angle.
You can get a rough idea of how to adjust the lie angle by measuring the inclination of the line, which is upright or flat.
Even a 0.5-degree deviation in lie angle can result in a large error if you fly 50 or 100 yards.
If you try to correct the deviation, you may develop strange habits, so you definitely want to adjust the lie angle to improve your game.
Here are some checkpoints for setting up a finesse wedge.
First, take a look at Justin Thomas’ finesse wedge setup.
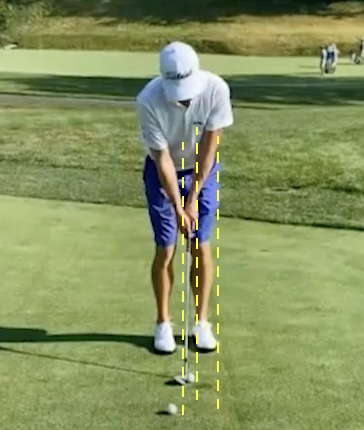
Stance
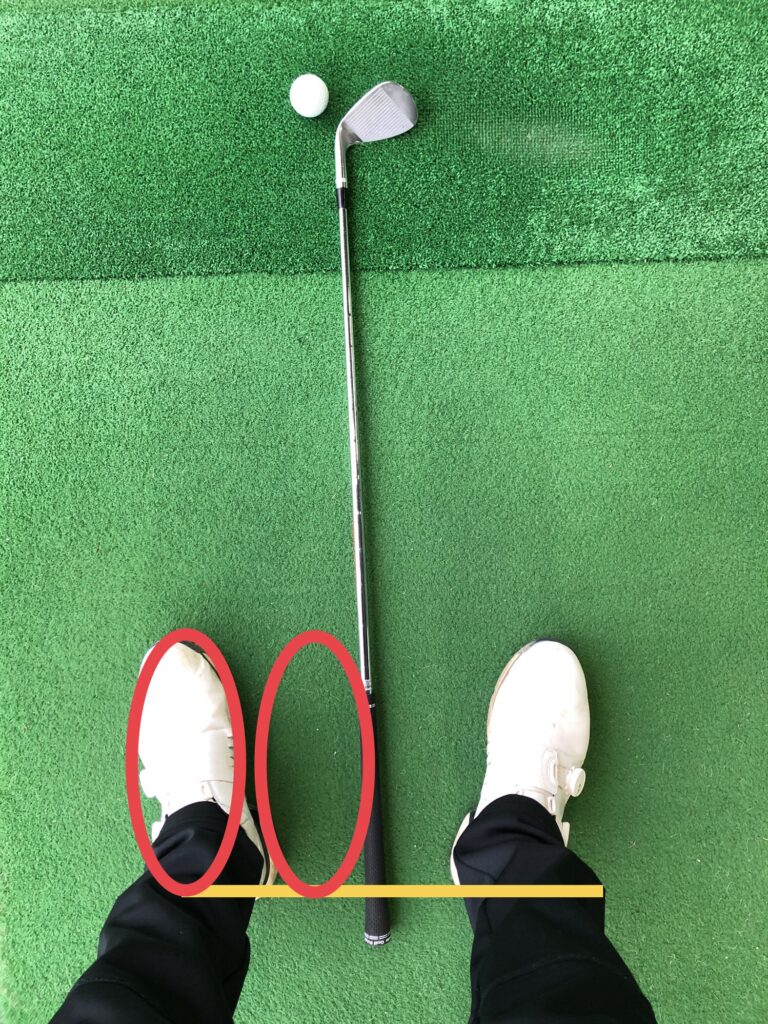
Leave a space of about 2-3 inches between your feet.
Pull the lead foot back slightly to create an open stance.
Shaft angle and ball position
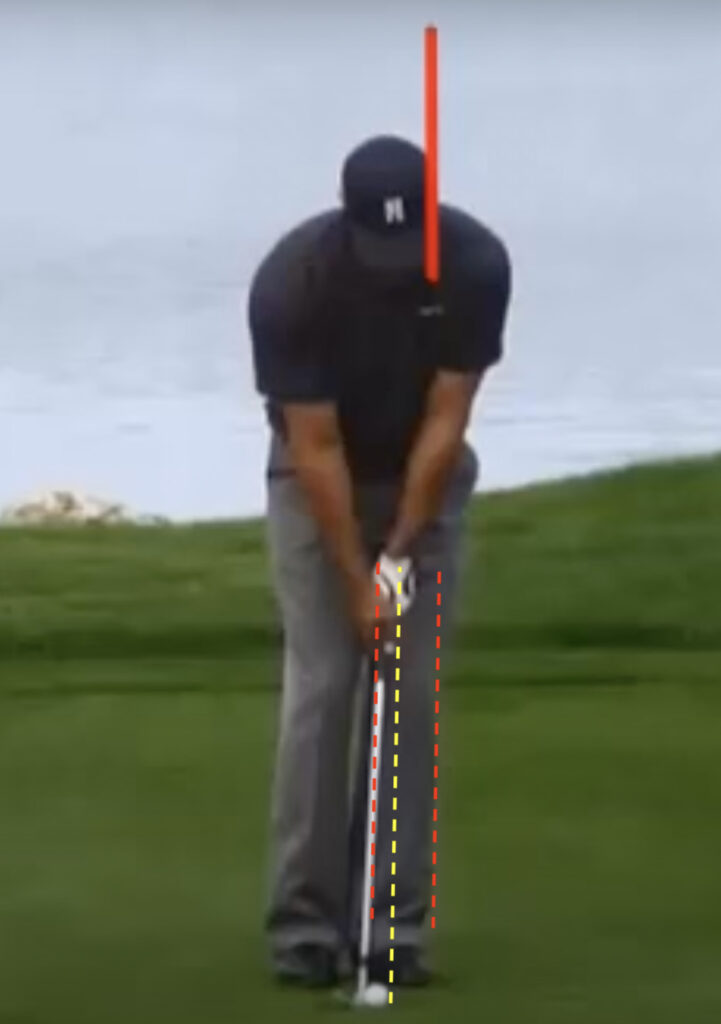
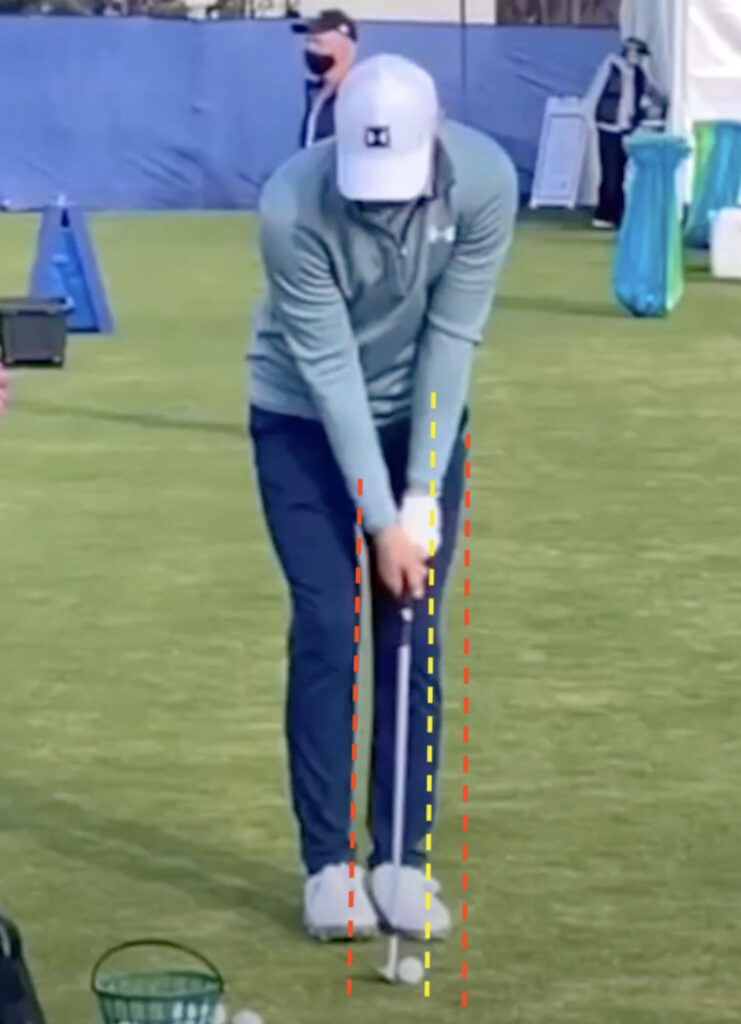
Tilt the shaft at a hands-first angle of about 3 to 7 degrees.
If you have a finesse wedge, you should hold the shaft perpendicular to the ground.
Tiger Woods, Spieth, and other short game greats all have a slight hand-first stance.
Take a stance and place the ball where you set up so that the shaft is tilted 3 to 7 degrees.
It will naturally be 2-3 inches from your trail foot to your lead foot.
Grip
The grip should be the same as in a normal shot, or slightly weak.
Arms
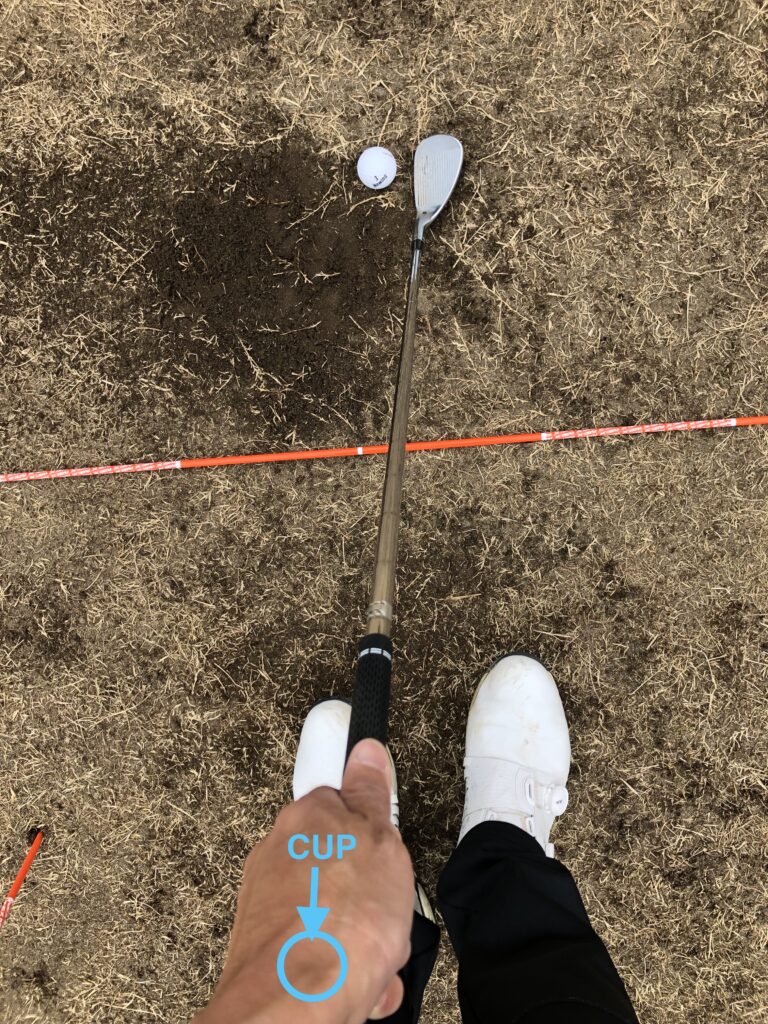
Relax your arms and let them hang from your shoulders.
Cup your lead wrist at the base of your thumb.
Shoulders
Keep both shoulders more parallel to the ground than in a normal shot.
It is impossible to make them perfectly parallel because the lead hand is lower than the trail hand, but try to make them more parallel than in a normal shot.
The parallel shoulders help avoiding too hard shots.
Chest
A little more open to the target.
Distance from the ball
The distance between you and the ball should be the distance of the club in your left hand grip.
Many amateurs tend to stand too close to the ball, so be careful.
Bunker shots with a distance of 40 or 50 yards are said to be difficult even for professionals.
Some amateurs may not know how to deal with long bunker shots in the first place.
The easiest way to deal with bunker shots is to use a club other than a sand wedge.
The setup and hitting technique is the same as the sand wedge.
A 50 degrees gap wedge looks like this.
Open about 45 degrees from the target.
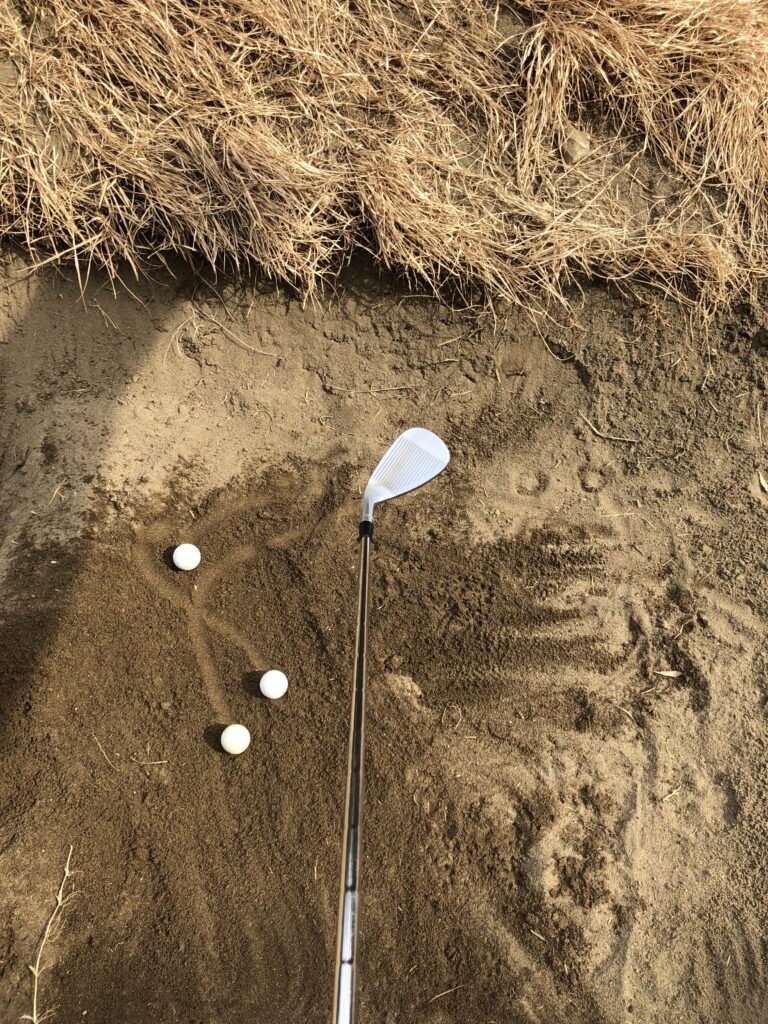
This is what it looks like when you have an open stance of about 20 degrees, a low back, and your left foot weighted.
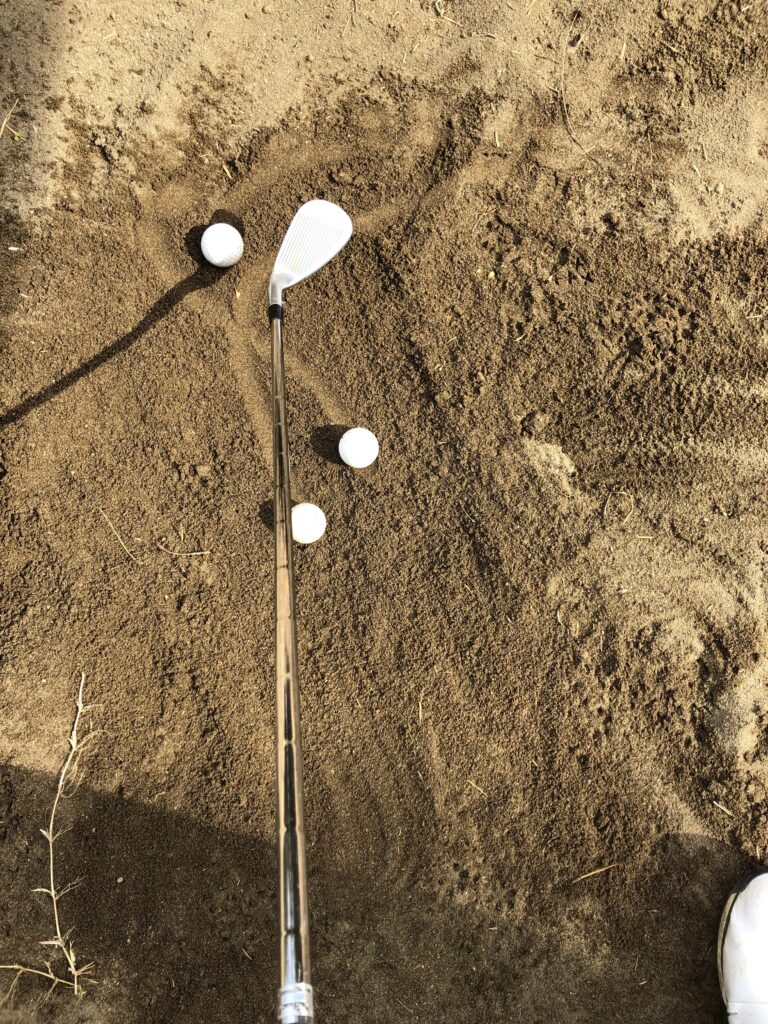
Then, in a stance, put the club in from the heel side of the head.
Personally, I find the 50 degree gap wedge to be quite useful for bunker shots.
It gives you more distance and gets you out of the bunker quicker.
I think if you practice from the sand wedge to about a 9 iron, you can use it in the real world.
Also, keep track of your carry distance in the bunker from the sand wedge to the 9-iron and write it down.
In my case, the carry with each club is as follows.
LW 60 degrees 10 yards
SW 54 degrees 14 yards
AW/GW 50 degrees 18 yards
PW 46 degrees 22 yards
9I 41 degrees 28 yards
Personally, I am good at bunker shots with a 50 degree gap wedge, so I use a gap wedge up to 40 yards.
I use a gap wedge up to 40 yards because I am good at bunker shots with a 50 degrees gap wedge.
At 40 yards, if I swing with the face slightly less open than usual, I can get a carry of about 22 yards and then pull it in with a run.
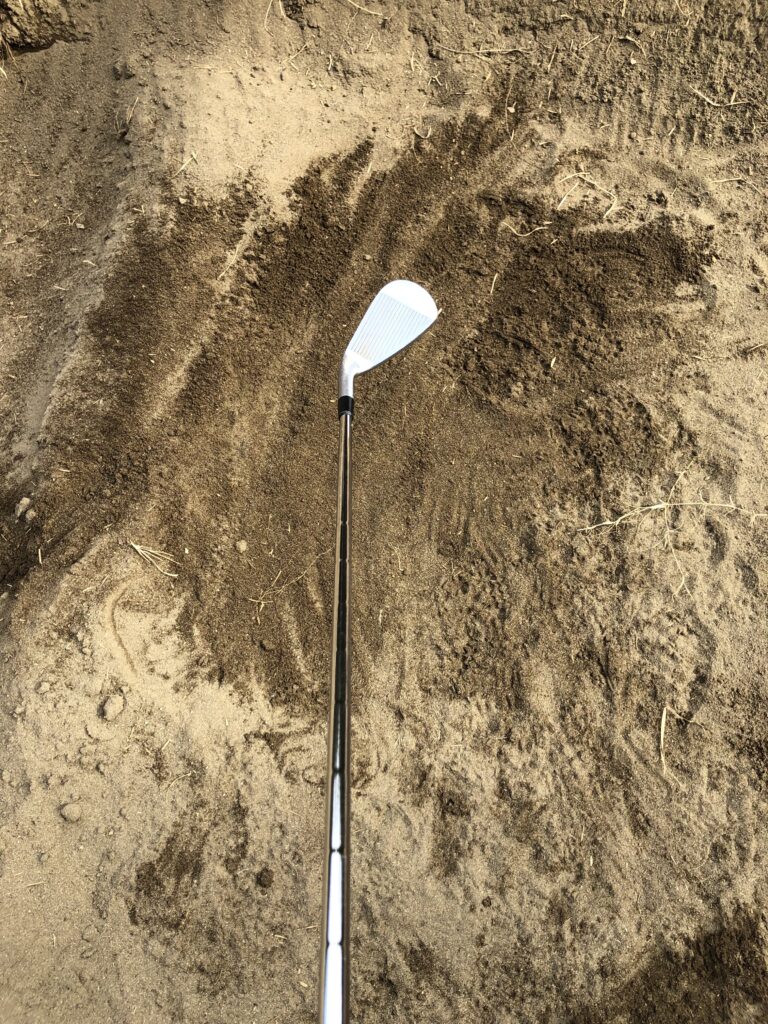
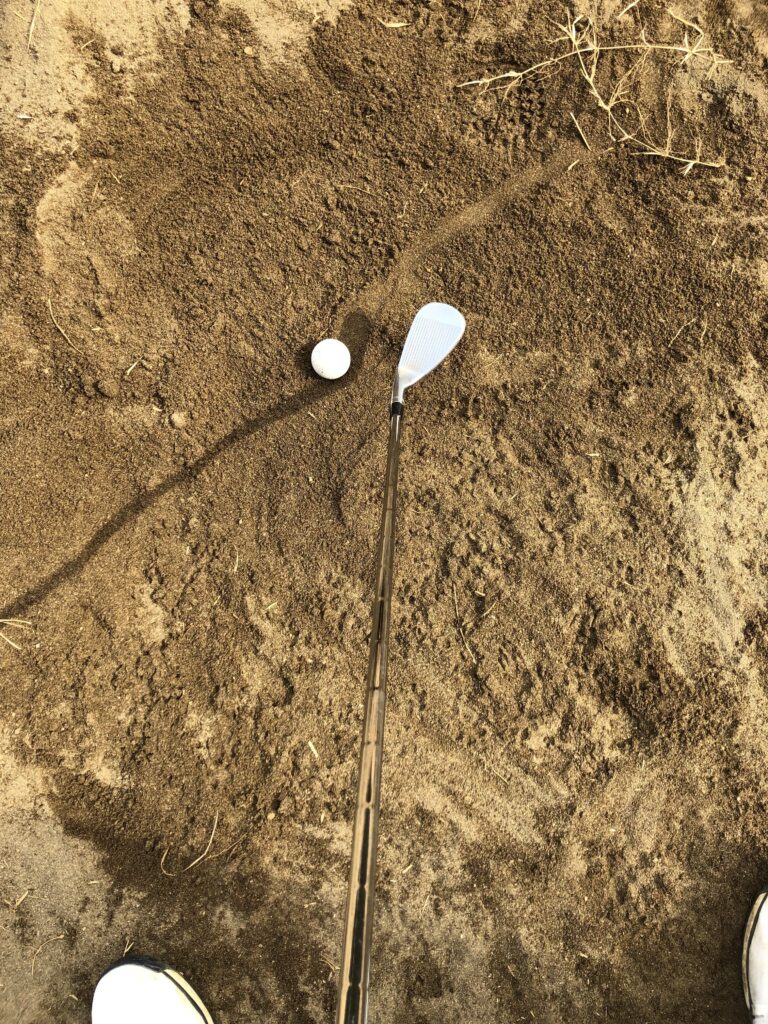
At 50 yards bunker shot, I can’t reach the ball with a gap wedge, so I choose either a pitching wedge with a slightly closed face, or a 9-iron with a normal swing, depending on the situation.
Here is a game called “Tornado” to train your green reading and mental skills.
Take six tees and choose a suitable cup on the practice green.
Stick the tees about 3 feet from the cup.
From the first tee, stick the tees in a circular motion at intervals of about 2 feet.
It should look something like this.
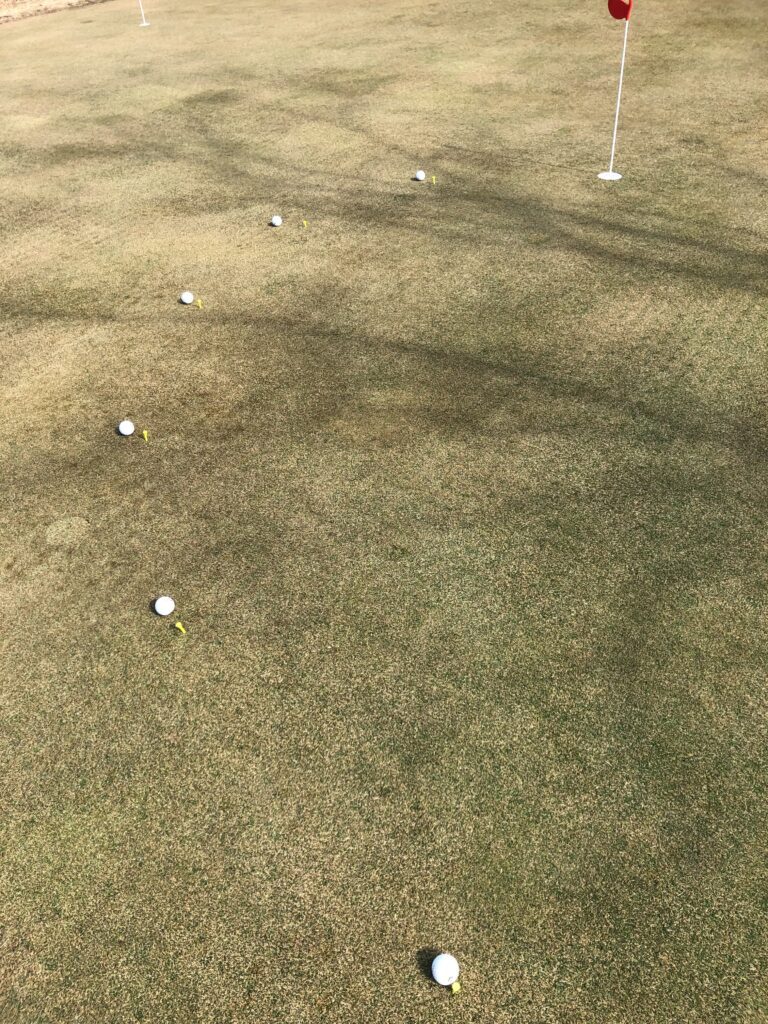
Then, start at the nearest tee and stroke toward the cup.
Since the tees are pointed in a circle, the slope of the green changes slightly from tee to tee, so you have to adjust the bend.
The goal of this game is to not make any mistakes.
From the first to the third tee, if you miss even once, it’s game over. You have to start all over again.
From the fourth to the sixth tee, you are allowed to make only one mistake.
Keep track of your successes from the first tee to the sixth tee.
You can’t make a mistake, so it’s a game that also trains your mental strength.
Many golfers keep track of their scores and check their par on percentage and bogey-on percentage for each round, but few golfers know what par on percentage and bogey-on percentage they should aim for to cut their score.
The following data is from Marke Broadie’s “Every Shot Counts” and is a rough guide to par-on percentage and bogey-on percentage by score.
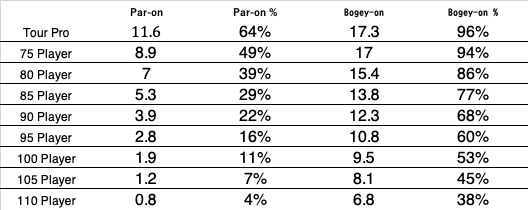
What should golfers in the 90s and 100s track, their par on percentage or their bogey on percentage?
Here is a graph of this data.
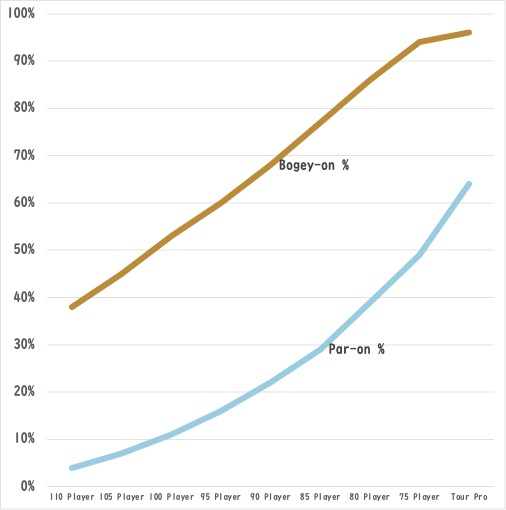
The bogey-on rate increases linearly (linearly) as the score improves, while the par-on rate is an exponential curve that increases dramatically as the score improves.
The par on rate rises sharply at around 80, but the rate of increase up to that point is slow.
In contrast, the bogey-on rate rises almost in proportion to the score, except for golfers in the 70s.
So, if you set your goal as a par on percentage, you will not be able to feel the improvement immediately.
After all, it is very important to experience success in order to improve.
If you are a 90 or 100 golfer, it is more difficult to improve your par on percentage than it is to improve your bogey on percentage.
In other words, you should focus on your bogey-on percentage and set your goals.
If you want to get under 90, you need to bogey on at 77%.
That’s about 14 times in 18 holes, or about 7 times in 9 holes.
If you want to get under 100, bogey on at 60%.
If you want to get under 100, you should aim to bogey 60% of the time, about 10 times in 18 holes and about 5 times in 9 holes.
I think many amateur golfers have been chasing the par on rate, but if you analyze the data and visualize it, you will clearly understand that it is better to aim for the bogey on rate.
Even in day-to-day business, a relatively simple data analysis and visualization can dramatically improve your business.
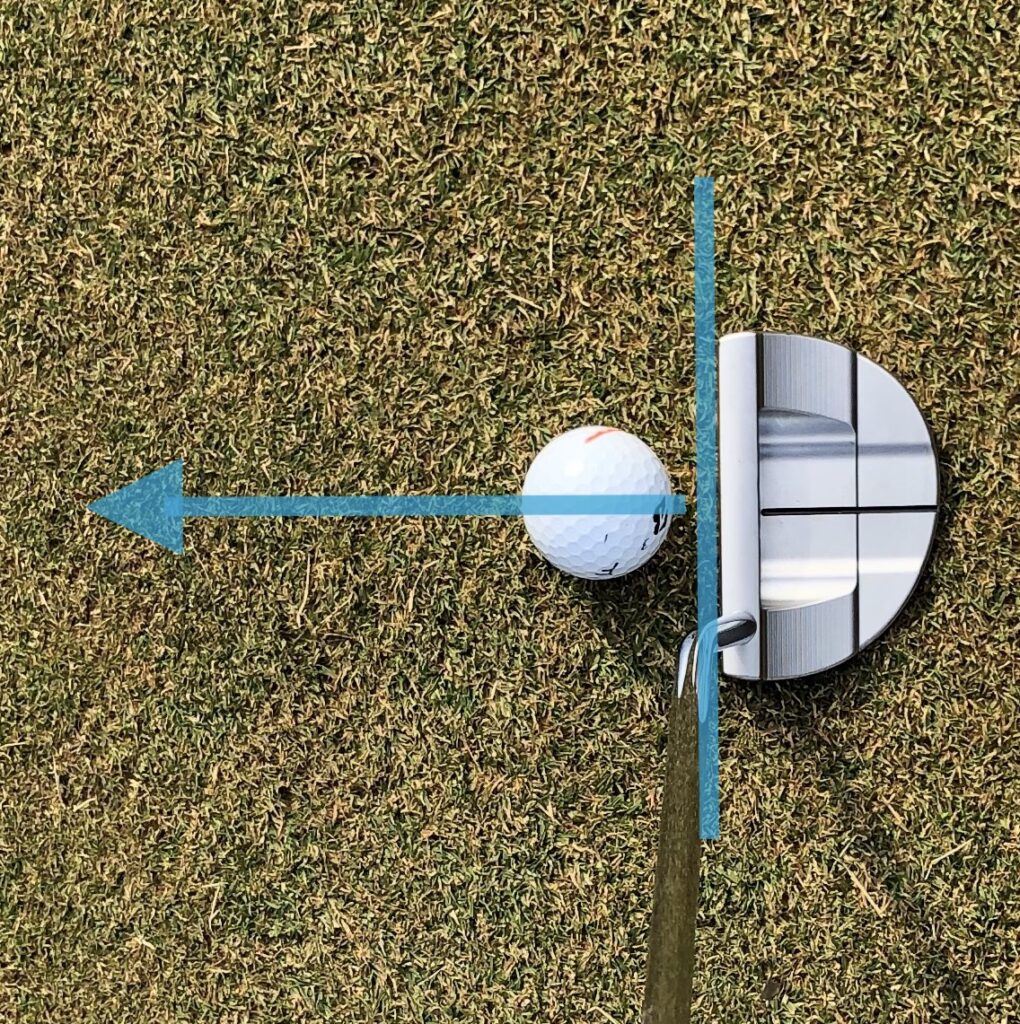
It is important to hit the ball in the center of the face with the putter.
If you hit the ball in the center, the ball will go straight out at 90 degrees to the face.
Basically, you should train yourself to hit the ball in the center.
However, even the PGA Tour pros can’t hit the ball in the center every time.
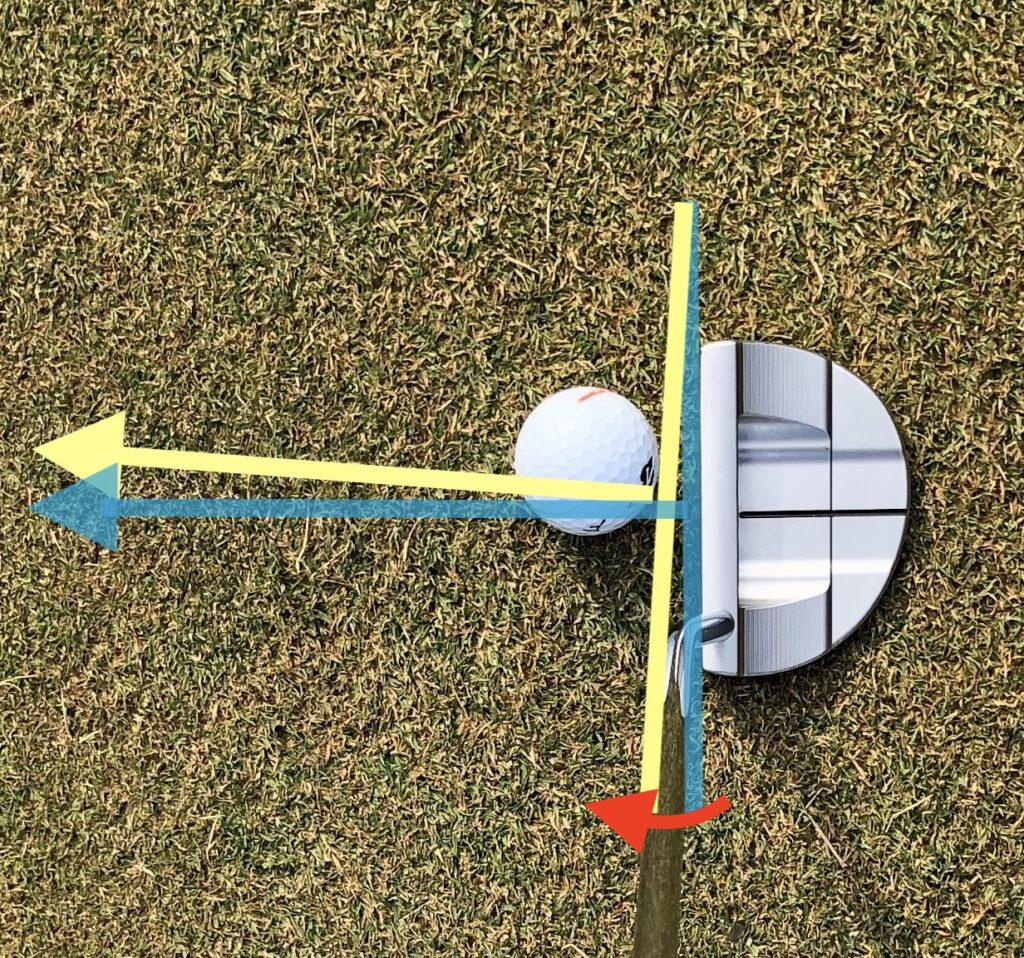
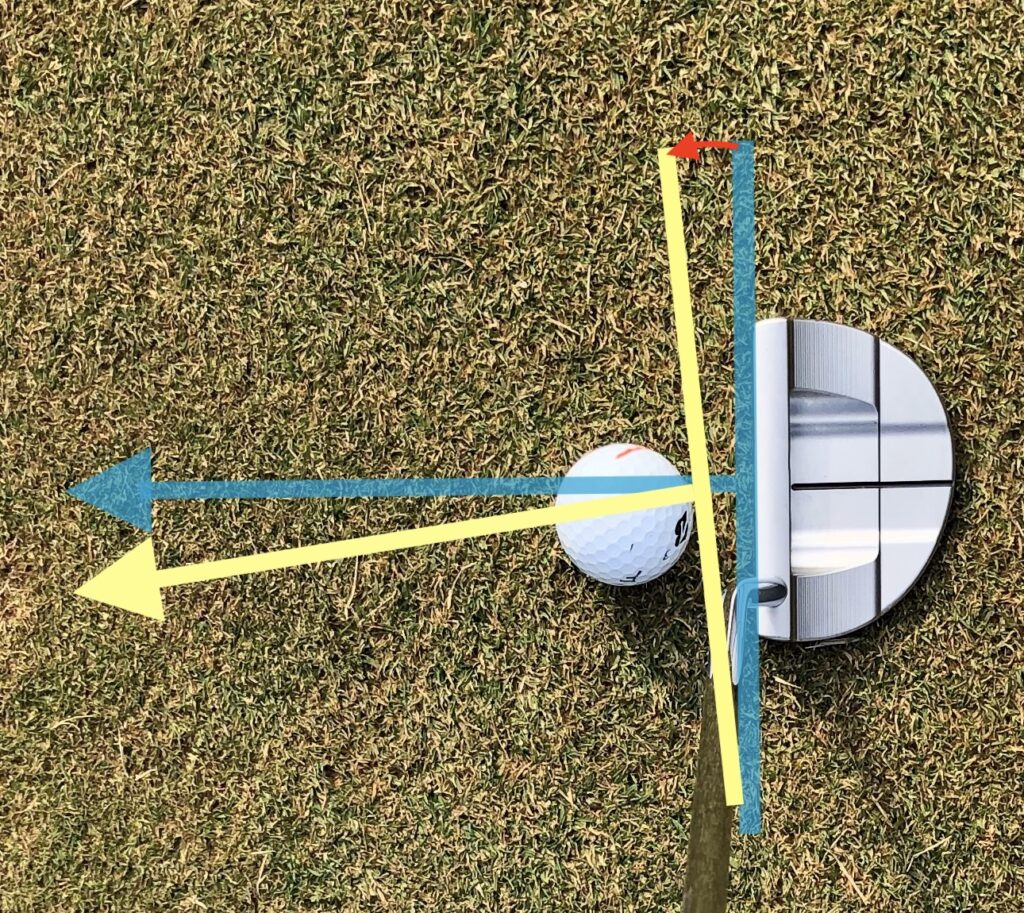
When you hit off-center, you need to know the direction of the ball so that you can take countermeasures against mistakes.
You will also be able to use the technique of using an off-center hit to get the ball into the cup.
The laws are simple.
There are three rules to keep in mind.
- If you hit the ball in the center, the ball will be launched straight.
- If you hit it on the toe side, the ball will be launched to the right.
- If you hit it on the heel side, the ball will be launched to the left.
If you remember the law correctly, you will be able to correct it correctly when you make a mistake.
I have been struggling with shanks since I started playing golf.
A common pattern is to shank on the approach and then hit the neck with irons and driver, a bad cycle.
I’ve tried various methods to avoid shanks, but while they may temporarily stop the shanks from coming out, they can’t fundamentally solve the problem.
Here are the measures I’ve taken so far.
1.Set the ball on the toe side of the clubface in setup.
It improves temporarily, but the shank soon comes out.
2.Set the ball on the heel side of the clubface.
I’ve seen lessons that tell you to set the ball on the heel side of the clubface, but this has the exact opposite effect. It did not cure the shank.
3.Close the clubface.
Doesn’t work at all. Maybe it’s because I’m a draw hitter by nature. If you are hitting the ball with an open face, this may help a little, but I don’t think it’s a fundamental solution.
I’ve tried all of these things, but they don’t work at all.
Even if it temporarily stops, the shank will appear soon.
However, I don’t have any problems with shanks now.
I don’t even get shanks in a round anymore.
The only solution is this.
Get the right distance from the ball! That’s all!
In my case, I was completely too close to the ball.
By standing farther away from the ball than ever before, I no longer get shanks at all.
Here’s how to measure the proper distance
- First, address the ball.
- Release the club and place it on the ground so that the grip is between your feet.
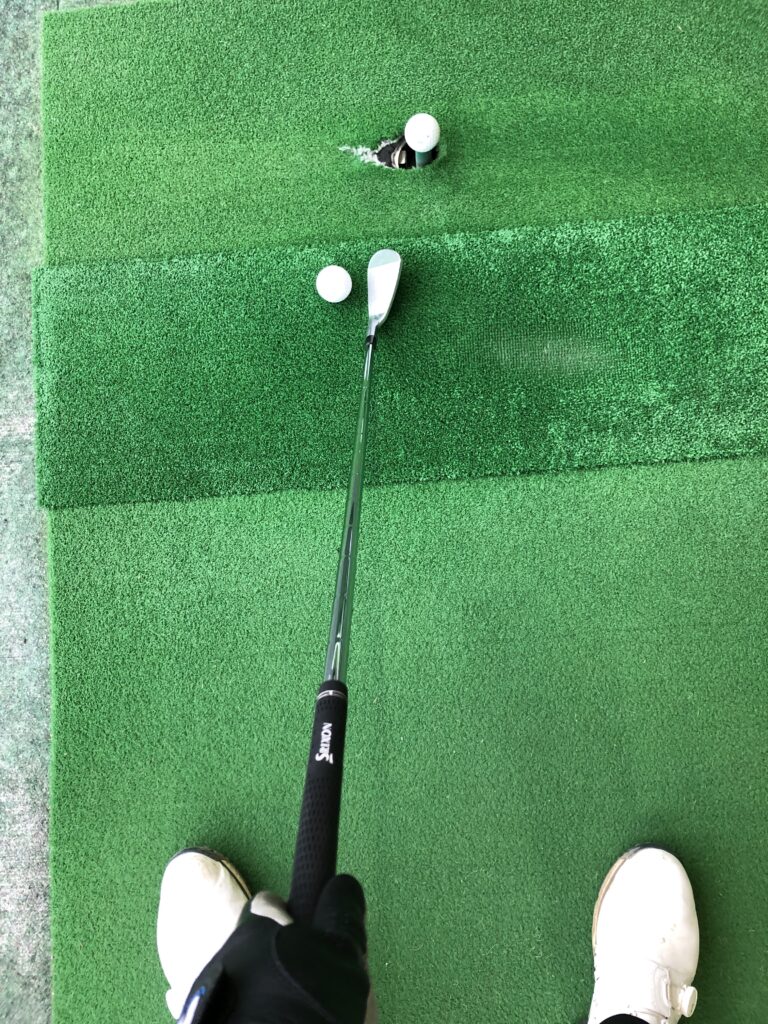
That way, you can place the club head at the ball and the grip between your legs.
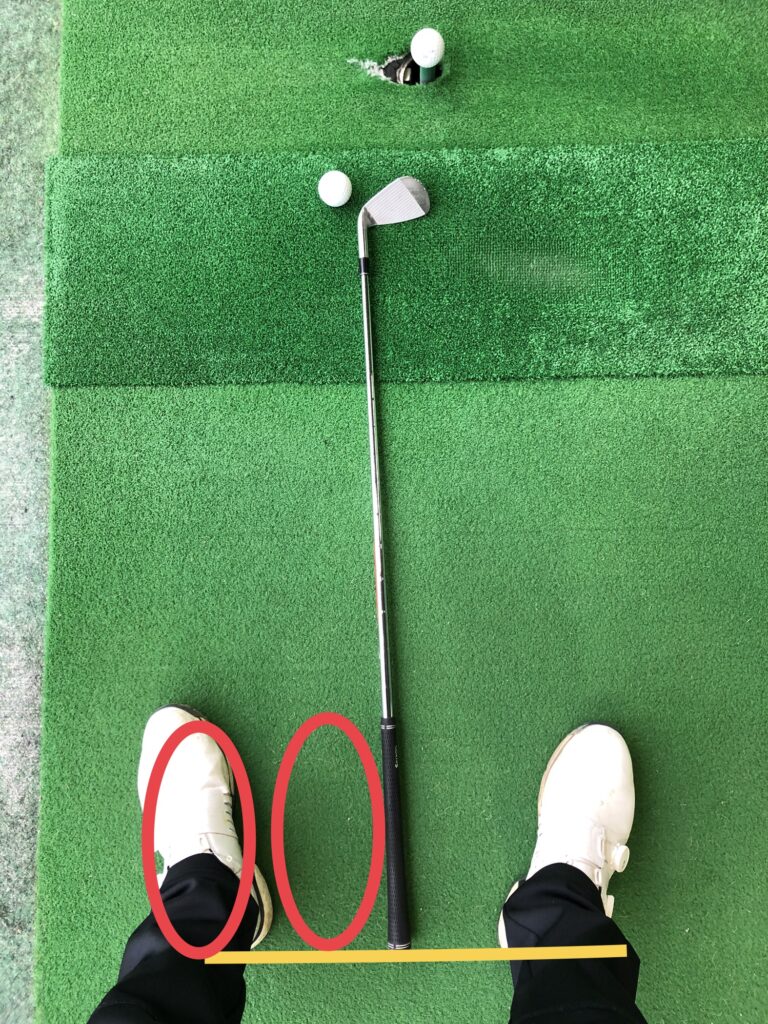
Then, when I had a lot of shanks, my grip would come out about halfway from my heel, which is the proper distance from the ball.
In the past, when I had a lot of shanks, my grip was so close to the ball that it came out about halfway from my heel.
At first, I thought, “That’s too far,” but now I can swing with confidence because if I keep this distance, I won’t shank no matter what I do.
Since the distance to the ball is farther, I naturally address the ball with my hands slightly extended.
If you still feel that you are too far away to hit the ball well, you should bend your knees a little more and be conscious of putting your weight on the ball of your thumb.
If you extend your knees, you will inevitably be closer to the ball due to your body’s structure.
By bending forward a little, you should be able to get closer to the ball.
And perhaps, like me, many amateur golfer’s setup is too close to the ball.
Even when I observe them on the golf course or driving range, most of them set the ball too closely.
You can use the same criteria whether you are addressing with a finesse wedge or an iron.
Please give it a try!
